Seville oranges, the bitter variety that we need for marmalade, are in season during January and early February. It's worth seeking out organic, unwaxed fruit (not hard to find - Waitrose stock them, and I'm sure any decent greengrocer will too) as you are going to be using the peel as well as the pulp. I got particularly lucky when I bought mine - the cashier decided that because they were knobbly and green-tinged they must be a bit dodgy, and try as I might to explain that they were a special type of orange she insisted on giving me a discount on them. If you insist! Golden granulated sugar seems to be the sugar of choice, with some people adding a little black treacle at the end of cooking to produce a characterstic dark coloured preserve. You don't need jam sugar with added pectin, because the oranges (specifically the pith and pips) naturally contain enough pectin to set the marmalade.
Anyway, the method involved first peeling your oranges (10 of them) and lemons (2 of them):
Then chopping up the peel to your desired thickness. This is probably the most labour-intensive part of the process - it took me over half an hour to chop up all the peel, but it does fill the kitchen with wonderful citrus scents.
 |
| Chop chop! |
The peel then goes in a bowl (or two bowls if, like me, you don't own a bowl big enough) along with 2.5 litres of water, the squeezed juice from the fruits, the pulp (chopped) and the pips (tied up in a muslin bag). This gets left to soak for 24 hours, to release the pectin from the pith and pips.
The next day, the peel, pulp, pips and water get transferred to a pan and boiled for about 2 hours until the peel is soft enough to squish between two fingers. After that, the bag of pips is removed, the sugar is added and the mixture is boiled (skimming off any froth that bubbles up) for 15-45 mins until set (this is tested by putting a tablespoon of the mixture on a saucer and chilling in the fridge for a few mins - if it forms a skin it's ready. Alternatively, use a sugar themometer - the setting point is 105C). When the marmalade boils it does tend to froth up, so you must have a big enough pan so that it won't bubble up over the sides, burning your hands and ruining your hob - I decided my stockpot wasn't quite big enough so I made the marmalade in two batches, straining the peel (but reserving the liquid) after the initial 2 hours of boiling, weighing out the peel and liquid into half quantities. Bit of a faff, so perhaps a big preserving pan might be a good investment in future! Once the marmalade has reached setting point, it's a good idea to leave it for 10 mins so that the peel is evenly distributed throughout the preserve.
 |
| Marmalade comes up to the boil |
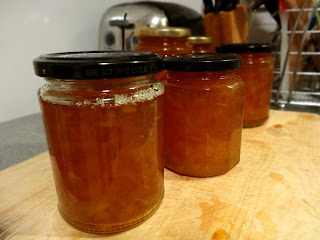
Finally, the marmalade is decanted into sterilised jars, and left to cool. After that, all you have to do is look forward to breakfast the next morning!
 |
| Done! |


No comments:
Post a Comment