Monday, 15 April 2013

Cheese, Tomato and Red Onion Rolls

These are a bit like savoury Chelsea buns - I had some cheese (mozzarella and taleggio), tomato sauce (tin of tomatoes, olive oil, garlic, herbs, sugar, salt and pepper reduced down to a thick sauce consistency), cherry tomatoes and red onion left over from some pizza making so I thought I'd see how these turned out - rather delicious as it happens! The filling could be varied according to your tastes and what you have in the fridge.


For the Dough:

500g Strong White Flour
7g Fast-action Yeast
10g Salt
310ml Water (room-temperature)
1 Tbsp sunflower oil

For the Filling:

Approx. 100g of Cheese (I used mozzarella and taleggio)
3 Tbsp Tomato Sauce (see above)
Half a Red Onion
A Handful of Cherry Tomatoes

1) Weigh out the flour in a bowl, and add the yeast and salt, keeping them separate  Add the water, mix, bring the dough together. Add the sunflower oil, and knead for 5-10 minutes. Form it into a ball and leave it in an oiled bowl covered with cling film to rise for 1-3 hours, until doubled in size.

2) Once risen, gently tip the dough out of the bowl onto a floured surface, trying not to knock too much air out of it. Stretch it into a rectangle (approx. 30x20cm). Spread your tomato sauce all over the dough, then place strips of cheese and thinly sliced red onion on top. Roll up the rectangle, keeping it as tight as possible. Once rolled, secure it by sealing the join with your fingers. With a sharp knife, cut the roll at 3cm intervals - you should end up with 10. Place the rolls on a baking tray lined with baking paper, leaving at least 1.5cm between each roll. Put the tray into a plastic bag (a clean bin liner works well) and leave to prove until doubled in size - between 30mins and an hour.

3) Once proved, dust the rolls with flour and push half a cherry tomato (cut side up) into the middle. Bake in a pre-heated oven at 220/200(fan) for 25-30mins. Leave to cool slightly on a wire rack, then tuck in while they're still warm.

Saturday, 2 March 2013

Recent Bread Baking Exploits

Last year I got in a bit of a rut with my bread baking - I was baking two white bloomers, once a week, and if I'm honest it all got a bit boring. This year, I'm being far more adventurous, helped in part by a baking stone, a shiny new food mixer (with a dough hook) and a couple of excellent books (namely 'The River Cottage Bread Handbook' and Paul Hollywood's 'How to Bake'). Here are a few of my recent experiments:

Ciabatta


A very difficult bread to make without a food mixer - ciabatta requires an incredibly wet dough in order to get the aerated texture. I made this one with some local flour from Gilchesters Organic - a mixture of 'rare breed' strong white bread flour and fine semolina. It's lovely flour that gives a noticeably different flavour to anything else that I've tried. Being home-grown it's not quite as high in gluten as some of the imported strong flours that I'd normally use, so it seems to benefit from a little extra kneading. I was quite pleased with the results - light and crusty, and richly flavoured from the olive oil. It made great panini the next day too!


Pizza Bread


An experiment in using a very wet ciabatta style dough as a pizza base. This was topped with mozzarella, blobs of rich tomato and garlic sauce, and some crispy fried bacon. It was very tasty and the ciabatta base was very light and crisp, but because of the nature of a wet dough the transfer from wooden board to baking stone proved a little tricky - precious buffalo mozzarella fell off onto the baking stone, only to be instantly cremated. A little practice is needed!

Seeded Bloomer


This was a case of using whatever I had in the cupboard - some Shipton Mill malted wholemeal flour, some strong white bread flour, a handful of seeds....

Brioche


Not a bread to bake if you're on a diet - this brioche contains 5 eggs and a whole pack of butter! As you would expect, it is light but rich - it virtually melts in the mouth, and although it's sweet it's still equally nice with cheese as it is with jam or marmalade. It's also remarkably easy to make provided you have a food mixer with a dough hook. Flour, salt, yeast, sugar, eggs and milk are kneaded together, and the butter is beaten in once the dough is formed. It's then chilled overnight in the fridge before shaping into balls and arranging in a deep cake tin. It then proves for 3 hours and bakes for 30 mins or so. I had a little dough leftover, which I topped with sesame seeds and baked in a muffin tray, - it came out looking like a brioche toadstool!


Sunday, 3 February 2013

Toad in the Hole

The rather magnificent sausage that I used for this was a Cumberland style whirl from my local supplier of rare breed middle white pork - Ravensworth Grange Farm . If you live in the North East then you owe it to yourself to try their pork - seriously tasty meat from seriously happy pigs! A classic toad in the hole was the obvious choice - I browned the sausage in a hot oven for 10 mins with plenty of oil, then poured in the batter (75g plain flour, 1 egg, 130ml milk, salt & pepper) and cooked for a further 30 mins. It was served with caramelised onions, roasted carrots and parsnips and steamed savoy cabbage. It was all over far too quickly for my liking! Comfort food for a cold night, just a shame the end product looked slightly rude to a childish mind....


Thursday, 31 January 2013

Challah Bread

After the fun of plaiting a loaf last week I thought I'd have a go at baking Challah - a traditional Jewish type of bread which is somewhere between a normal white loaf and a brioche - the dough is enriched with eggs and a little milk and sugar, which makes it deliciously rich without losing the light airiness that we associate with yeasted breads. I followed Paul Hollywood's recipe for this, using a three strand plait shape - a total breeze after the eight strand fun last week! The shaped dough is egg-washed, left to prove and then baked for about 25 minutes. It does take on colour quickly so it's worth watching it - I put a sheet of foil over mine after the first 15 minutes to stop it browning any further. Here it is in all its glory:


It's great toasted and buttered, and I reckon any stale leftovers would be great in a bread and butter pudding (not that there's much chance of stale leftovers in this house!).

Sunday, 27 January 2013

Burns Night

25th January - the one day of the year when, traditionally, Scottish people are allowed to consume more alcohol and saturated fat than is recommended by their doctor....

I have a real fondness for Burns Night, perhaps because as an expatriate Scot living in the North East of England I feel I ought to celebrate my Scottish roots when I can, lest I become converted to the ways of the 'sassenach'! I like the fact that the food we eat for this celebration isn't the excess of the prime cut of meat or the enormous roasted bird that we associate with other annual festivities - in true Scottish spirit the haggis is a humble, thrifty food that all of us can afford, and in my view every bit as delicious as leg of lamb or a roast turkey. The main ingredients, of course, are the heart, liver and lungs from a sheep, plus beef suet, oatmeal, onion and spices. We get a little squeamish at the idea of offal these days - haggis comes from a time when we would never have dreamed of wasting any part of an animal, especially not when it tastes so good. Team this "chieftain o' the puddin' race" with 'bashed neeps' (mashed swede) and 'champit tatties' (mashed potato) and you have a meal fit for Rabbie himself, for little more than £1.50 a portion. For our Burns night we had a three course Scottish feast. First up, homemade oatcakes:


....with some Strathdon Blue highland cheese, homemade chutney and mustard pears:


Next, the main event! Macsween haggis, honey roasted 'bashed' neeps, buttery 'champit tatties' and a whisky cream sauce:

Bashed Neeps

The Chieftain


Making the first incision

Gently does it!

Thar she blows!

Let battle commence!

And, to finish, a seasonal take on a classic Scottish desert - Rhubarb and Whisky Cranachan! Rhubarb, honey, whisky cream and toasted oats in perfect harmony:


Happily, we had leftover haggis for the next day, which naturally enough found itself on top of a pizza, along with the rest of the strathdon blue and some shredded brussels sprouts. Even I was dubious about the wisdom of this combination, but I'm happy to report that it was delicious, although I fear it may not catch on in Italy:

Just like Granny used to make...?


Oh, and we had a little leftover rhubarb and cream, so a 'deconstructed cranachan' followed:


A good weekend for food, a bad weekend for my arteries!

Saturday, 26 January 2013

Broccoli Pasta

I do enjoy the challenge of creating a satisfying meal from whatever you have in your fridge and cupboards. This was a good way of using up some broccoli that needed eating, and it required nothing more than what most people already have in their cupboards.


Serves 2

Half a head of broccoli, broken into small florets
1 onion, sliced
1 garlic clove, finely chopped
Parmesan
A little full-fat milk or cream
Herbs (parsley, basil, oregano - whatever you have to hand)
Olive oil
Salt and pepper
200g Pasta

1) Get a large pan of salted water on the boil. Cook the broccoli in the water for about 5 mins or until just tender. Remove it with a slotted spoon, leaving the pan of water on the boil. Add the pasta to the water and cook until 'al dente'.

2) Sweat the onion in a little olive oil until soft. Add the garlic, fry for a minute. Add the cooked broccoli, stir to coat in the oil, then add the milk, parmesan (to taste) and herbs. Remove half of the contents of the pan and blend until smooth. Return to the pan. Season the sauce with salt, pepper and more parmesan to taste. If it's too thick add more milk or some of the pasta cooking liquid. Stir into the pasta, serve with more parmesan and black pepper.

Very green!

Friday, 25 January 2013

Pigeon Breast, Puy Lentils, Winter Veg

I've written before about how highly I rate the meat of the wood pigeon. Basically, if you like venison, you're bound to like pigeon. Flavoursome, plentiful, cheap, healthy - there's really nothing not to like. Here, I've teamed it with puy lentils (flavoursome, plentiful, cheap, healthy.... sounds familiar!) which I love. They soak up flavour brilliantly provided you dress them while they're still hot, and their earthy flavour goes really well with the richness of the pigeon breast. You might want to serve two breasts each, although we found one was satisfying enough, with plenty of other flavours going on. You could even serve it without any meat, perhaps with a chunk of crusty bread to mop up the lentils.


For the Pigeon Breast:

1 or 2 Pigeon breasts each
Olive oil
A knob of butter
Salt & black pepper

For the Puy Lentils:

75g Puy lentils per person
1 Bay leaf
A few parsley stalks
Half an onion

(For the dressing):

2 tbsp Olive oil
1 tsp English mustard
1 tsp Honey
Lemon Juice
1 Garlic clove, crushed
Salt & black pepper

For the Winter Veg:

2 Carrots, peeled and sliced into medium chunks
Half a celeriac, peeled and diced
Half an onion, sliced
2 sticks of celery, diced
30g butter
A pinch of sugar
Lemon juice
Flat leaf parsley
Kale or cabbage (optional)

1) Wash the lentils thoroughly under cold water. Put them in a pan with the bay leaf, parlsey stalks and onion, add enough cold water to cover, bring to the boil and cook for 20-30 minutes until tender. Meanwhile, shake up the dressing ingredients in an empty jar, taste and adjust as necessary. When the lentils are cooked drain them, remove the bay leaf, return to the pan and add the dressing. Set aside.

2) Put the carrots, celeriac, onion, celery, butter and sugar in a pan with a pinch of salt and pepper. Add enough cold water to cover, bring to the boil and simmer with the lid off until the water has evaporated. The carrots should be tender and buttery, and the celeriac should have collapsed into a sweet puree. Finish with lemon juice and parsley. If you're serving kale/cabbage too then boil until tender and dress with olive oil and lemon juice.

3) When you're nearly ready to serve, heat a pan on a high heat. Rub salt, pepper and olive oil on the pigeon breasts then cook in the hot pan for 4 - 5 minutes, turning every minute. Add the butter for the last minute, basting the breasts. Set them aside on a warm plate to rest for 5-10 minutes. Serve!


I hid my lentils under everything else for some reason - lentil surprise! Presentation has never been my strong point.....

Plaited Loaf

This one was a bit of fun - an attempt at Paul Hollywood's 8 strand plait, as featured in his 'How to Bake' book. The dough is just a standard white bread dough (using 600g strong white bread flour). Once the dough has risen to at least double its original size it is knocked back, then split into 8 equal portions (I found each piece weighed 126g - it's worth being quite precise).

Not too little, not too much!

Next, the balls of dough are rolled out into strands of around 40cm in length:

Bread or sausage?

Next, the plaiting begins! The trick, I think, is keeping it quite tight and making sure the strands remain nice and thin.

Bread or octopus?

Eventually you reach the end of the strands, and at this point I find it's usually a good idea to hold the shaped dough up and get someone to take a photo of you looking smug:

I made this.

The dough is then left to prove for about an hour, while it nearly doubles in size.

Time to 'prove' your worth, dough!

Finally, the dough is baked at about 220C for about 30mins, with a baking tray of boiling water in the bottom of the oven to help delay the formation of the crust, and thus help it rise further. I found my oven browned the crust pretty satisfactorily after about 15 mins, so I turned it down to 180C for the remainder of baking. As with all bread, a hollow sound when tapped on the bottom is a fairly good indicator that it is cooked, although if you're in any doubt then an extra 5 minutes will do it no harm.

When the bread has cooled sufficiently, the final step is to have another smug photo taken with the finished product:

Did I mention that I made this?

Every bit as important as looking good, it tastes great too. Good quality flour and a good slow rise are two of the key things when making a loaf (and, coincidentally, these are two things that are so often neglected in commercially produced bread). Furthermore, it slices into a pleasing cloud-shaped cross-section - certainly cheers me up in the morning!

Sunday, 20 January 2013

Marmalade Making

I spent last weekend peeling, chopping, squeezing, boiling and decanting. The result was 11 jars of homemade marmalade, and quite delicious it is too! I had never made marmalade before, and there were no shortage of recipes to choose from - it seems that marmalade recipes are, quite rightly, a great source of pride to their authors, having been honed and refined every January, year after year. Everyone seems to more or less agree on the proportions - 1 part Seville oranges, 2 parts water, 2 parts sugar and about 1 lemon per kg of oranges. It's the method that causes disagreement - to cut the orange peel chunky or to shred it finely? To soak overnight or boil the oranges whole? To set the preserve to a firm jelly or leave it a little runny? It's a minefield for a marmalade novice like myself, but after a certain amount of research I decided to follow Nigel Slater's Recipe from his 'Kitchen Diaries II', along with occasionally consulting Dan Lepard's in-depth discussion of the method and science of marmalade making.

Seville oranges, the bitter variety that we need for marmalade, are in season during January and early February. It's worth seeking out organic, unwaxed fruit (not hard to find - Waitrose stock them, and I'm sure any decent greengrocer will too) as you are going to be using the peel as well as the pulp. I got particularly lucky when I bought mine - the cashier decided that because they were knobbly and green-tinged they must be a bit dodgy, and try as I might to explain that they were a special type of orange she insisted on giving me a discount on them. If you insist! Golden granulated sugar seems to be the sugar of choice, with some people adding a little black treacle at the end of cooking to produce a characterstic dark coloured preserve. You don't need jam sugar with added pectin, because the oranges (specifically the pith and pips) naturally contain enough pectin to set the marmalade.

Anyway, the method involved first peeling your oranges (10 of them) and lemons (2 of them):


Then chopping up the peel to your desired thickness. This is probably the most labour-intensive part of the process - it took me over half an hour to chop up all the peel, but it does fill the kitchen with wonderful citrus scents.

Chop chop!

The peel then goes in a bowl (or two bowls if, like me, you don't own a bowl big enough) along with 2.5 litres of water, the squeezed juice from the fruits, the pulp (chopped) and the pips (tied up in a muslin bag). This gets left to soak for 24 hours, to release the pectin from the pith and pips.


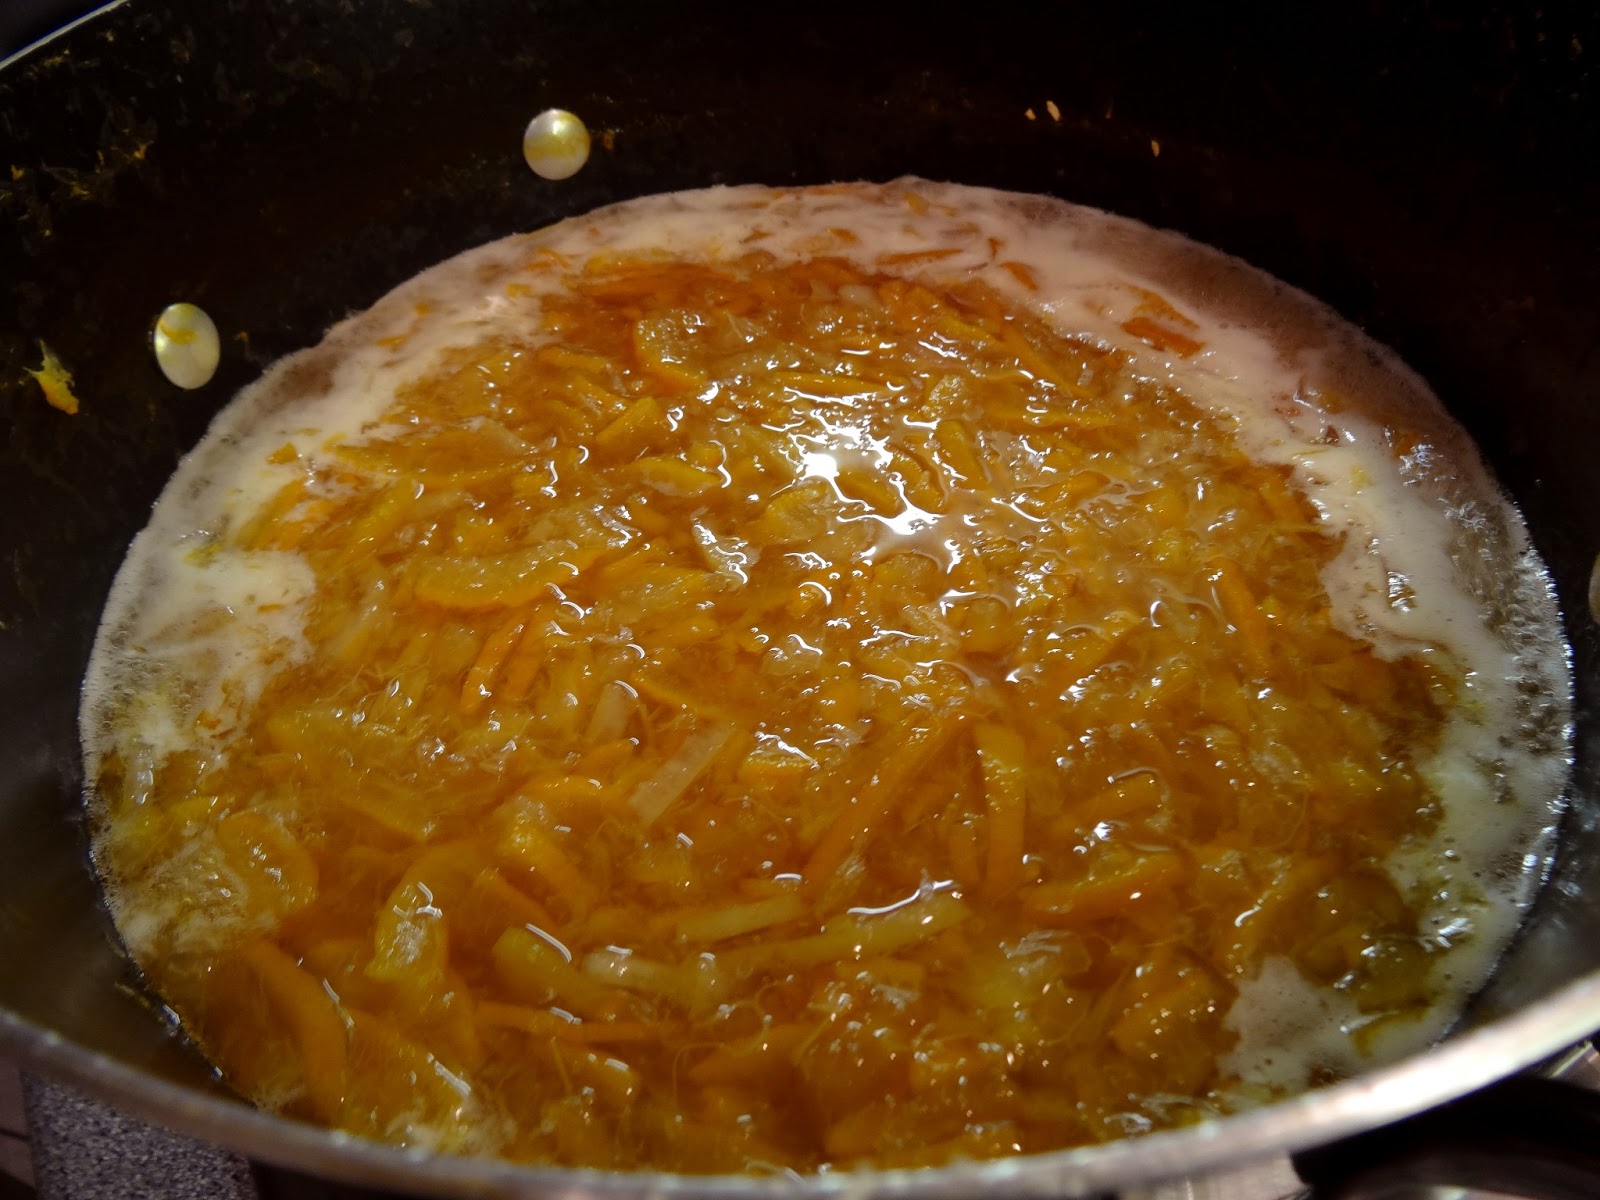
The next day, the peel, pulp, pips and water get transferred to a pan and boiled for about 2 hours until the peel is soft enough to squish between two fingers. After that, the bag of pips is removed, the sugar is added and the mixture is boiled (skimming off any froth that bubbles up) for 15-45 mins until set (this is tested by putting a tablespoon of the mixture on a saucer and chilling in the fridge for a few mins - if it forms a skin it's ready. Alternatively, use a sugar themometer - the setting point is 105C). When the marmalade boils it does tend to froth up, so you must have a big enough pan so that it won't bubble up over the sides, burning your hands and ruining your hob - I decided my stockpot wasn't quite big enough so I made the marmalade in two batches, straining the peel (but reserving the liquid) after the initial 2 hours of boiling, weighing out the peel and liquid into half quantities. Bit of a faff, so perhaps a big preserving pan might be a good investment in future! Once the marmalade has reached setting point, it's a good idea to leave it for 10 mins so that the peel is evenly distributed throughout the preserve.

Marmalade comes up to the boil

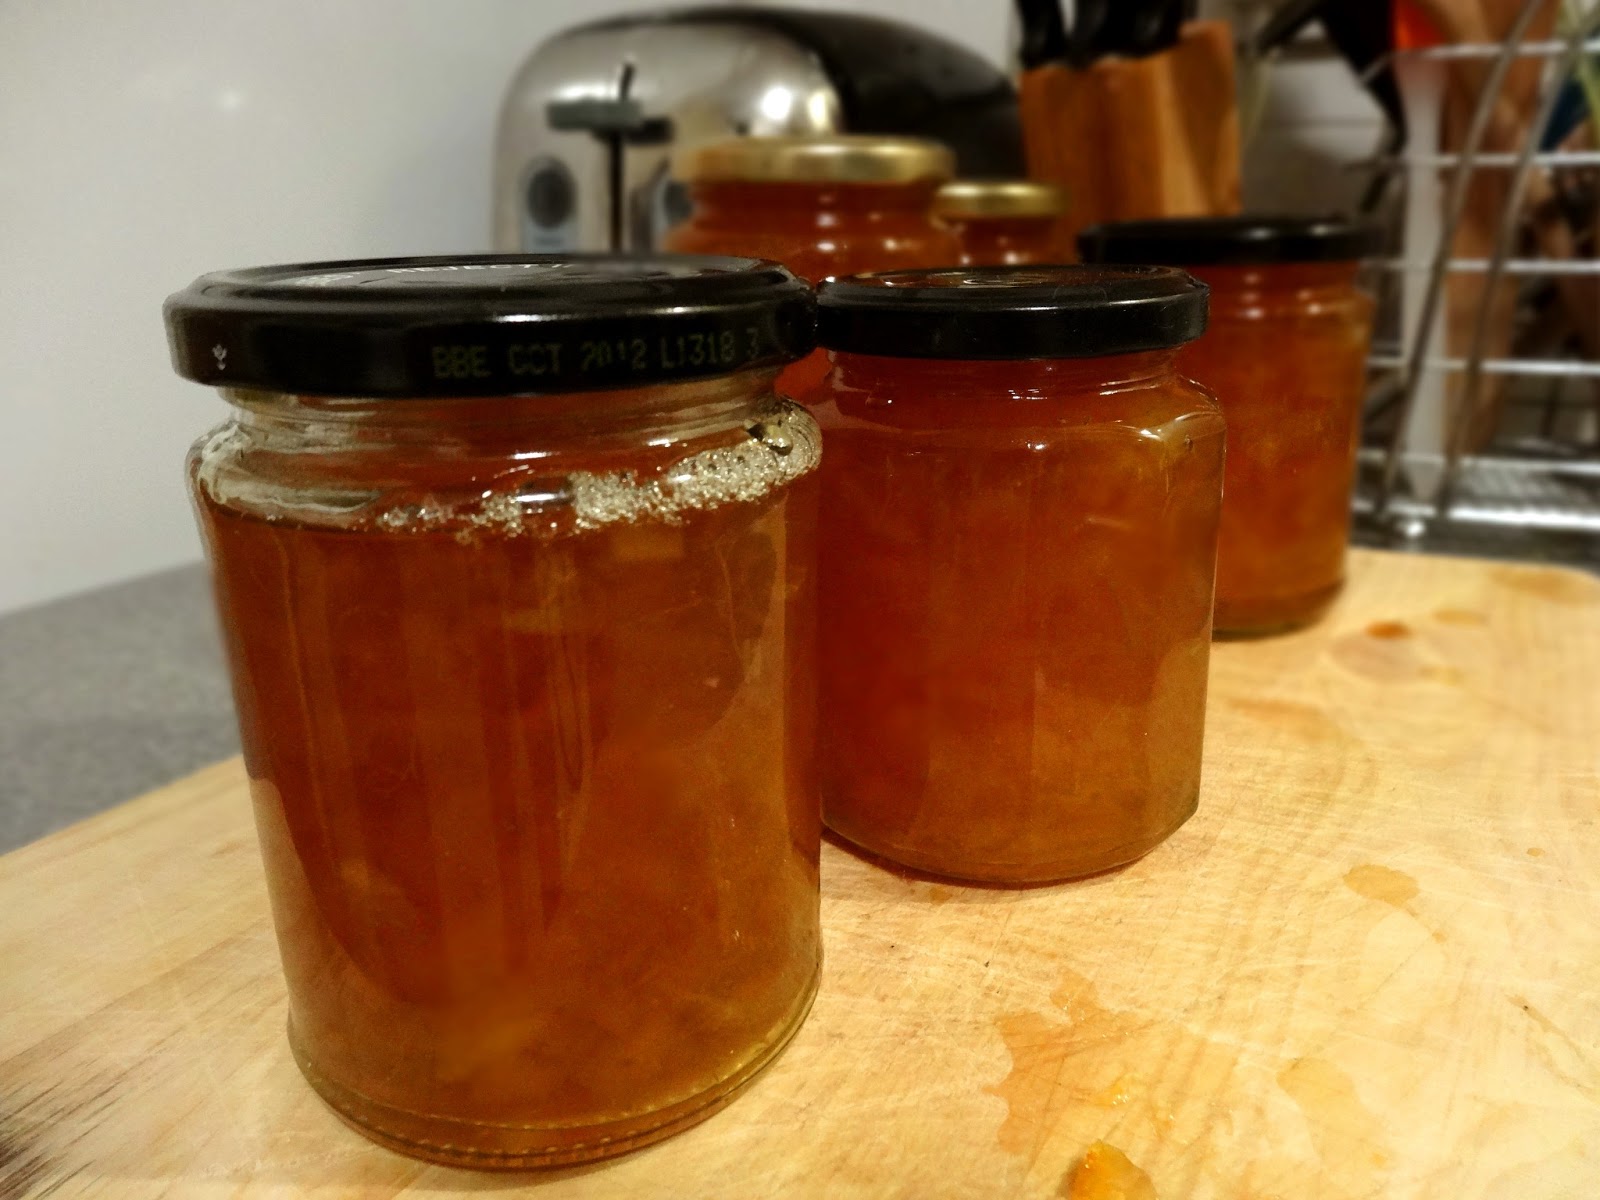
Finally, the marmalade is decanted into sterilised jars, and left to cool. After that, all you have to do is look forward to breakfast the next morning!

Done!

Friday, 18 January 2013

North East Food Heroes: NEOG

As part of a new monthly feature I'm going to focus on some of my favourite places to buy, eat and shop for food in the North East. I think we've got some amazing producers in this region, and as I hope I'm demonstrating in this blog, it's possible to eat extremely well even on a fairly low budget.

So, without further ado, my first 'North East Food Hero' is NEOG (North East Organic Growers)!

NEOG run a weekly organic veg bag scheme from their farm in Bomarsund, Northumberland. We have been receiving a weekly veg bag from them since June 2012, and even through an appallingly wet summer the quality and variety of veg has been terrific. They grow what they can themselves, and source the rest from a network of other organic farms, primarily local, with the occasional import during the less fruitful months (sourced as close as possible, and never air freighted). Veg bags are delivered weekly to a number of different links across the region (we pick ours up at St Thomas' Church in Newcastle city centre on a Wednesday). Buying our veg direct from growers helps to keep costs down (we pay £11 for a large bag, which provides the two of us with the vast majority of our weekly veg requirements). It also means we're often getting fresher veg than the supermarket could ever offer - carrots that left the ground hours rather than days ago, and sweet tasting freshly cut greens. 

The contents of our NEOG bag in early September

Having no control over what veg we get week to week might seem restricting, but in fact we have found it quite liberating - cooking with whatever the season provides helps us avoid the inevitable banality of mindlessly putting the same things in our shopping basket week after week. It forces us to be imaginative in the kitchen, consulting the cookbooks and throwing unusual combinations together. It also gives us, in the risk of sounding a little hippy-dippy, a sense of being in tune with the seasons - when we eat asparagus we know spring is here, when we eat courgettes we know that summer is in full swing, and when parsnips turn up in our bag we know the frosts have set in. Far from restricting our diet, it gives us ultimately more variety, with our way of eating changing from month to month.

NEOG also offer side orders of things like fruit, honey, organic eggs (we get bananas and lemons as part of our weekly order) at very reasonable prices. We've even had some of their gooseberries, which were delicious! If all this sounds like something you might be interested in then check out their website for information on how to start a trial. For me, they are true food heroes - organic vegetables, cheaper and fresher than you can buy in the supermarket, grown by people who care. What's not to like?!

Sunday, 13 January 2013

Ricotta & Sundried Tomato Ravioli

Making use of another Christmas present here - my new ravioli press! I've been making occasional batches of fresh pasta for the past year using a pasta roller. The process takes a while, but it's very good fun working the pasta dough through the roller as it gets thinner and thinner. I still use a lot of dried pasta, but when I have the time it's very satisfying to make my own, and cut it to whatever shape/thickness I want. The basic recipe for pasta dough is very simple, involving only two ingredients - flour (tipo 00) and egg. Roughly 100g flour to one egg (multiplied as required), kneaded, rested and then rolled out. For ravioli, you want quite a thin pasta sheet - rolled out to setting 8 on your machine - as it will be doubled up when you assemble them. If you don't make your own pasta, then I'm sure you could still have good results if you buy sheets of fresh pasta to make ravioli with. Provided, of course, that you have a ravioli press!


Serves 2

For the Ravioli:

150g fresh pasta, thinly rolled out
100g ricotta cheese
50g sundried tomatoes, finely chopped
1 egg, beaten
parmesan
parsley, finely chopped
salt and black pepper

For the Sauce:

1 small glass of white wine
1 onion
2 garlic cloves
50g green olives
20g sundried tomatoes
2 tbsp double cream
parmesan
salt and black pepper

1) Arrange the pasta sheet on the ravioli press according to instructions. In a bowl, combine the ingredients for the filling, only adding as much egg as you need to bind it all together. Spoon the mixture into the ravioli, filling them completely to avoid any air bubbles forming.


2) Place the other half of the pasta sheet on top and roll over it with a rolling pin to seal. Turn the ravioli out.


3) Get a large pan of salted water boiling rapidly. Meanwhile, sweat the onion in a little oil until soft but not browned, add the garlic and fry for a minute then add the wine along with the olives, sundried tomatoes, a good sprinkle of grated parmesan and some salt and pepper. Allow the wine to bubble and reduce, then add the cream and heat through for a minute or so. Cook the ravioli in the boiling water - they should pop up to the surface after a minute or so. Cook them for a further couple of minutes then remove from the water and let them steam dry. If the sauce is too thick, add a little of the cooking water, then serve with a grating of parmesan and a grinding of black pepper.


Home-Baked, Stone-Baked Pizzas

It was an extremely successful Christmas as far as kitchen equipment goes - amongst other things we now have a mixer, a mincer, a ravioli press, a proper carving knife and, perhaps most exciting of all, a baking stone (from http://hobbshousebakery.co.uk/) for all my bread baking exploits! A baking stone essentially gives you that stone baked effect in a normal oven. It absorbs heat much better than a baking tray and therefore gives the dough more of a lift when it goes into the oven, allowing it to rise more as the air pockets expand. All of this means that as well as great loaves, I can now make proper pizzas with a crispy, blistered base:

Couple of stone baked white bloomers


Just like Mama used to make....

To make 2 pizzas I use:

125g Strong White Bread Flour
125g Plain White Bread Flour
3g Fast-action Dried Yeast
5g Salt
160ml Water
1 tbsp Olive Oil

In a bowl, combine the flours, yeast and salt, keeping the yeast and salt on seperate sides of the bowl. Add the water and mix with one hand until the dough starts to come together. Tip it out onto a clean surface, add the oil and knead for 5-10mins until smooth and stretchy. Form it into a round. Clean the bowl out, lightly oil it, place the dough in it and cover with clingfilm. Leave to rise for 1-3 hours. If you have a baking stone, preheat your oven to maximum well before you intend to bake, with the stone on the shelf in the top of the oven.


Ready for the oven!

Once risen, tip the dough out onto the surface, deflate it with your fingers and divide into two equal portions. Form each into a ball then roll them out to roughly 1-2mm thickness. Coat them well with semolina or polenta and place on a wooden board or a rimless baking sheet. Add your toppings (don't overcrowd it) and transfer either to your baking stone (the transfer can be a little tricky - make sure the pizza isn't too big for the stone, and that the base is well coated so that it won't stick to your board) or to a preheated baking tray. Bake for up to 10 mins - keep an eye on it, you'll know when it's done.

A word on toppings:

  • For a tomato base you can use tomato puree, but I think you get a much better depth of flavour if you fry a little garlic and thyme in olive oil, add a tin of plum tomatoes, mash them with a fork, add a bay leaf, salt and pepper, and a pinch of sugar and reduce down for 30 mins until you have a deliciously tomato-ey paste.
  • If you're using veg such as aubergine, courgette, pepper then it's nice to roast them for about 30 mins first - that way you get a nice caramelisation, and they lose a lot of their water content, meaning you don't get a soggy base.
  • When you've arranged your toppings, a little drizzle of olive oil will help get everything nice and charred.
  • I went for a classic Mediterranean style roast veg and buffalo mozzerella topping on this occasion, but sometimes it's good to think outside of the box - try some seasonal veg like kale or beetroot, or some local cheese - blue works great, as does goat's cheese.
Aubergine and Red Pepper, pre-roasted


Saturday, 12 January 2013

Roast 'Middle White' Pork Belly


Pork belly is, undoubtedly, one of my favourite cuts of meat. When cooked properly, it offers us crispy, salty crackling, meltingly tender meat and a delicious layer of fat. However, as is always the case with meat, we must chose what we buy carefully. The quality of pork available to us in this country varies considerably – at worst we have pork imported from the EU, reared in conditions that would be illegal in this country (sows confined in stalls, unable to even turn around). That’s not to say that the standards in the UK are consistently higher – our cheap UK pork comes from pigs who are still reared intensively indoors on wooden slats, without even any straw for bedding. We’re talking about social animals of a similar level of intelligence to dogs here – pigs love rooting around in mud, and they like having their own space from time to time. Frustration in our intensively reared pigs often leads to them biting each other’s tails, and as a result it is common for piglets to have their teeth clipped and tails docked without anasthetic. All of this simply because we refuse to pay a few extra pennies for our bacon? Not for me thanks.
There is, of course, an alternative. The main labels to look out for if you want to buy pork from pigs that have had a happy life (and regardless of what you think about the ethics, there is no doubt that slow growing, traditionally reared pork tastes much better) are free range and organic. ‘Outdoor-bred’ and ‘outdoor-reared’ pork varies in welfare standards – the pigs still spend a large portion of their lives indoors, sometimes in less than desirable conditions. If you can, it is worth searching out a local producer of rare breed pork – these pigs are traditional breeds, shunned by commercial agriculture post-WWII when production intensified because they grow slowly, and don’t deal well with a life indoors. Without exception these rare breeds (Middle White, Gloucester Old Spot, Saddleback and more) taste amazing. They have more fat, which gives the meat flavour and keeps it moist during cooking. Happily, while it is fattier, it tends to contain more mono-unsaturated fat and less saturated fat than intensively farmed pork so is also a healthier option. A great number of small producers across the country are now specialising in rare breed pork – we get our middle white pork and bacon at our local farmers market (http://ravensworthgrangefarm.co.uk/). If you have a producer near you then I urge you to support them – without these producers the breeds would eventually die out which would be a great, great loss. Yes, it costs a little more than cheap supermarket pork but who cares? Eat less, and eat better quality.
Anyway, back to the roast pork belly:
Really easy to cook – make sure the skin is dry, and score it with a sharp knife (or get the butcher to do it). Rub plenty of salt into the skin, and a few aromatics if you fancy (crushed fennel seeds, coriander seeds, caraway…. etc.). Preheat your oven to maximum and roast the pork for about 20 mins until the skin crackles, then turn it right down to 160C and roast for a further 2 hours or so until the meat is very tender. I threw a loads of root veg, and a few segments of lemon and orange under the pork for the last hour of cooking. Rest the meat for at least 15 minutes once it comes out of the oven. Serve with the roasted roots and anything else you fancy. The meat should be so juicy that you don’t really need a gravy. Makes great leftovers for sandwiches, stir frys, salads etc.
In other news, a trip to the farmers market this morning yielded a pheasant, a woodcock, roe venison strip loin, 2 pigeon breasts, 2 guinea fowl breasts, 2 middle white pork chops, 2 packs of middle white bacon, middle white chipolatas and 4 pig kidneys. Should keep us going for a month or so!